Showing posts with label Things To Try/Do. Show all posts

Wednesday, March 28, 2007

Bedsheet with Rules


No more hogging the sheets!

I could benefit from a set of these. I always get the short end of the sheets.

Couple can be a game or a monitoring system.
The ruler is printed so as to be readable from inside the bed.
The numbering rises outwards and from warm to cold colours.
Each person knows how much he or she can pull and how far apart the couple rests.

Wednesday, February 7, 2007

Chocolate-Dipped Heart Cookies


My goodness, don't these look yummy!

Prep Time: 1 hr
Start to Finish: 1 hr
Makes: 2 dozen cookies

1 roll (16.5 oz) Pillsbury® Create ' n Bake™ refrigerated sugar cookies
1/4 to 1/2 cup all-purpose flour
1 1/2 cups semisweet chocolate chips
1 tablespoon shortening
Colored sugar


1. Heat oven to 350°F. Remove half of cookie dough from wrapper; refrigerate remaining dough until needed. Sprinkle about 3 tablespoons of the flour onto work surface; coat sides of half of dough with flour. With rolling pin, roll out dough to 1/4-inch thickness, adding additional flour as needed to prevent sticking.

2. With floured 3-inch heart-shaped cookie cutter, cut out hearts. Gently brush excess flour from hearts; place 2 inches apart on ungreased cookie sheets. Repeat with remaining half of dough.

3. Bake 7 to 9 minutes or until light golden brown. Cool 1 minute; remove from cookie sheets to cooling racks. Cool completely, about 15 minutes.

4. In 1-quart saucepan, heat chocolate chips and shortening over low heat, stirring occasionally, until melted and smooth. Remove from heat. Dip half of each cookie into melted chocolate, allowing excess chocolate to drip off; place on waxed paper-lined cookie sheets. Sprinkle with colored sugar.

High Altitude (3500-6500 ft): No change.

VIA

Sunday, February 4, 2007

Soup Swap

I can't even remember where I originally saw this but I do have the original blog link. It sounds like fun.

Soup Swap

What is a Soup Swap, you say?
Well, a Soup Swap is quite simple:

You bring six 1 quart containers of frozen soup of one kind. You will then draw numbers and take turns picking out different soup. You will then leave with six 1 quart containers of different soup. Bring whatever soup you like to cook best.

The instructions for arriving with your soup are clear - but a tip for you. Most soup recipes don’t make quite enough soup. Double the recipe when prepping for soup swap.

I'd have to fudge the number drawing in order to get at my mothers wonderful Potato Soup before anyone else. Or just announce that the host gets first pickin's or something like that.
There can be door prizes and taste tests. There are also accessories like crackers and napkins.

I have never made soup in my life so I have no idea what kind of soup I would bring to the party. I'm sure I would be expected to bring something with venison in it. But I can guarantee that the way I prepare venison, they would never know the difference.
I think I would love to try some sort of seafood soup. As long as it wasn't fishy smelling, I would probably like it.

Mom.....I am craving your Potato Soup now.......I need soup, please.

Wednesday, January 10, 2007

Cleaning To-Do Lists

Cleaning To-Do Lists

Easy gameplans for every day, week, and season

Cleaning To-Do Lists
Peter Margonelli
KITCHEN
Every Day
  • Wipe down the sink after doing the dishes or loading the dishwasher (30 seconds).
  • Wipe down the stove top (one minute).
  • Wipe down the counters (one minute).
  • Sweep, Swiffer, or vacuum the floor (two minutes).

  • Every Week

  • Mop the floor (five minutes).
  • Wipe the cabinets, backsplashes, and appliances (10 minutes).
  • Wash the dish rack (four minutes).
  • Wipe the switch plates and phone (one minute).
  • Wipe the inside of the garbage can (one minute).

  • Every Season

  • Empty and scrub down the inside of the refrigerator (30 minutes).
  • Empty and clean the insides of the utensil drawers (15 minutes).
  • Scrub down the cupboard exteriors (30 minutes).
  • Clean the stove-hood filter (10 minutes).
  • Perform "Shiny Sink 101"


  • Cleaning To-Do Lists
    Mikkel Vang

    BATHROOM
    Every Day
  • Wipe out the sink (30 seconds).
  • Wipe the toilet seat and rim (15 seconds).
  • Swoosh the toilet bowl with a brush (15 seconds).
  • Wipe the mirror and faucet (15 seconds).
  • Squeegee the shower door (30 seconds).
  • Spray the entire shower and the curtain liner with shower mist after every use (15 seconds).

  • Every Week

  • Scrub the tub (three minutes).
  • Scrub the tiles (five minutes).
  • Mop the floor (two minutes).
  • Wipe the switch plates, doorknobs, and doorjambs (one minute).
  • Empty and wipe out the wastebasket (30 seconds).

  • Every Season

  • Take down the shower curtain, then launder it according to the care instructions.
  • Empty, weed, and clean the medicine cabinet (20 minutes).
  • Perform "Shiny Sink 101" on the tub and sink.


  • Cleaning To-Do Lists
    Mikkel Vang
    BEDROOM
    Every Day
  • Make the bed (two minutes).
  • Fold or hang clothing and put away jewelry (four minutes).
  • Straighten out the night-table surface (30 seconds).

  • Every Week

  • Change the sheets (five minutes).
  • Dust all surfaces — including electronics, books, picture frames, windowsills and ledges, and tops of door frames — and remove all cobwebs (10 minutes).
  • Dust or mop the floors or vacuum the carpeting (five minutes).
  • Throw out old magazines (one minute).
  • Wipe the switch plates, doorknobs, and doorjambs (one minute).
  • Wipe and disinfect the telephone (30 seconds).
  • Empty the wastebasket (20 seconds).
  • Vacuum the heating and air-conditioning vents and the inside of the closet (three minutes).

  • Every Season

  • Wash the insides of the windows (15 minutes).
  • Strip the bed and flip the mattress (five minutes).
  • Launder the mattress pad and dust ruffle.


  • Cleaning To-Do Lists
    Mikkel Vang

    LIVING-AREA
    Every Day
  • Pick up crumbs and dust bunnies with a handheld vacuum (one minute).
  • Fluff the cushions and fold throws after use (two minutes).
  • Wipe tabletops and spot-clean cabinets when you see fingerprints (one minute).
  • Straighten coffee-table books and magazines. Throw out newspapers. Put away CDs and videos. (Two minutes.)

  • Every Week

  • Dust all surfaces — including electronics, books, blinds, picture frames, windowsills and ledges, and tops of door frames — and remove all cobwebs (15 minutes).
  • Dust-mop the floors with a microfiber cloth or a Swiffer, or vacuum the rugs and carpeting (five minutes).
  • Vacuum the upholstery (five minutes).
  • Throw out old magazines (one minute).
  • Wipe the switch plates, doorknobs, and doorjambs (one minute).
  • Wipe and disinfect the telephone (30 seconds).
  • Shake out or vacuum the doormat (one minute).
  • Vacuum the heating and air-conditioning vents (one minute).

  • Every Season

  • Wash the insides of the windows (15 minutes).
  • Lift big pieces of furniture and vacuum or mop underneath (10 minutes).


  • Tuesday, January 2, 2007

    Literary Clock

    Literary Clock

    Super easy project, make a book into a clock. Perfect for a child's bedroom--use a storybook. Or the kitchen--use a cookbook. And a great gift for a kid. Or for anyone. There is a book for every hobby...

    Friday, December 29, 2006

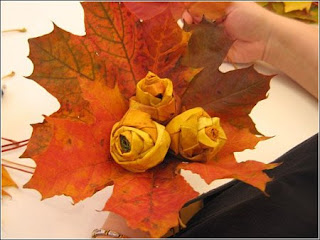
    Maple Leaf Roses


    Excellent picture tutorial on how to make roses out of maple leaves. A perfect fall project!

    Wednesday, December 27, 2006


    DIY Maven has a fun tutorial on Curbly on how to make a potted light bulb lamp that's cute and doesn't need any water.


    Wednesday, December 20, 2006

    Microwavable Mitten Warmers


    DIY site Instructables shows you how to make microwavable mitten warmers using little more than a few pieces of fabric, a handful of rice and some thread.

    The key ingredient is the rice, which, when nuked, stays nice and warm for upwards of an hour. The tutorial shows how to make a variety of warmers, including some that require no sewing.

    Microwavable Mitten Warmers

    Sunday, December 17, 2006

    How To Make A Christmas Card Star

    Christmas Card Star from WikiHow


    What a great way to re-use your old Christmas cards from year to year instead of throwing them away.

    Friday, December 15, 2006

    Paper Holidays!

    Jaime over at Paper Forest has assembled an incredible list of holiday papercrafts.

    Spiky Star http://swapatorium.blogspot.com/2005/12/spiky-star.html

    Zero from the Nightmare Before Christmas (Purchase the CD from Trader Sam-the least you can do for all his other magnificent Free models.)
    http://disneyexperience.com/models/zero_model.html

    and Jack Skellington's Coffin Sleigh (same deal)
    http://disneyexperience.com/models/sleigh_model.html

    Moving Santa Model (Nominal fee for Download)
    http://www.flying-pig.co.uk/pagesv/hohoho.html

    Santa Popper (nominal Fee for download)
    http://www.flying-pig.com/pagesv/santapopper.html

    Cool 3-d snowflake
    http://www.wikihow.com/Make-a-3D-Paper-Snowflake

    Printable tree for those with NO space
    http://www.hp.ca/portal/hho/holiday/tree_printout.php?jumpid=ng-nov06-projec

    Keisuke Saka's Carolers
    http://www.zuko.to/kobo/down-f/song.html

    Keisuke Saka's Reindeer
    http://www.zuko.to/kobo/down-f/deer.html

    Paperpino's Flying Santa
    http://paperpino.net/showroom/index.php?main_page=product_info&cPath=1&products_id=7

    Pop-up Tree, Pointsettia (new), and Reindeer
    http://www.robertsabuda.com/popmakesimple.asp

    Holiday Costume for your Paper Bear and more to explore!
    http://cp.c-ij.com/english/3D-papercraft/toy/t-christmas-costume_e.html

    Holiday Gift Box
    http://cp.c-ij.com/english/3D-papercraft/event/xmas-box-star_e.html Star Box

    Cards from Epson Hong Kong
    http://www.epson.com.hk/files/minisite/papercraft/card.htm

    Snowflake cut-out cards
    http://members.shaw.ca/woa/christmas.htm

    Simple Tree Place Card
    http://www.marthastewart.com/page.jhtml?type=content&id=channel192449&contentGroup=KIDS&site=kids

    Dreidel Favor Box
    http://www.thecraftypc.com/dreidfavbox.html

    Paper Snowflakes
    http://www.marthastewart.com/page.jhtml?type=content&id=channel181245&navLevel=2&site=kids

    Paper Snowflake templates
    http://www.papersnowflakes.com/templates.htm

    Rob Ive's List of paper models (many aren't included here)
    http://www.flying-pig.com/pages/christmasmodels.htm

    And Flying Pig has assembled their own fantastic list:

    Festive Paper models to print out and make.
    A selection to paper animations from our site and from around the web for you to download print out and make.
    Let us know if you find any others we can add to the list. Ho ho ho!
    Santa

    Santa Popper
    Press down on his head and he raises his arms cheerfully. One of our models available here.


    Stella Stellated Solids
    ...make fantastic Christmas decorations! More info.
    Hako Santa
    From the Paper Pino web site The HPH Santa disassembles and fits completely into his head.
    Free to download here
    Warming Up
    By Keisuke Saka. Delightful model with an athletic Rudolph limbering up for the big day!
    Free to download here
    Christmas Kiss
    One of ours! Charming moving Christmas card. Pull the tab and the festive couple kiss under the mistletoe.
    Free to download here
    Ho Ho Ho!
    Another one of ours! Turn the handle and the jolly Santa laughs heartily!
    Download here
    Flying Santa
    Another model from Paper Pino - What fun!
    Download for free here

    Pop Up Christmas Card from Canon
    Reindeer and Sleigh
    Christmas Game
    Carol Singers

    Christmas Tree
    Christmas Tree with Stange Characters
    Hako Reindeer
    Santa on rails
    Various Christmas Trees
    Turkey!
    Flying Angel
    Nativity Scene
    Snowflake Cards
    Interesting Santa
    Various very nice pop up cards
    Weird sort of Santa thing
    Flying Santa
    Thanks to Arturo Palacios and others for these links! Have fun everyone. I'm going to start with the nice pop up cards.


    I LOVE PAPERCRAFTS! Can you tell?

    Wednesday, December 13, 2006

    Checker Set from The Reign of Ellen

    Is this not the cutest thing!? Ellen from The Reign of Ellen made these for her boss for Christmas. It's inspired me to make a chess or checker set of my own someday. Check out The Reign of Ellen blog. She's a stay-at-home mom and artist. I love her insights.

    From The Reign of Ellen:


    Feeling much better this week, I finally finished a project, during Anna's naptimes, that has been hanging over my head for years now.

    About four years ago, I promised to make my boss a chess set for a Christmas present. I even let him pick out the theme. Of course, he had to go and pick something as complicated and non-girlie as World War I. Sigh. I was thinking circus-themed or Princess Bride-themed. Along those lines. Whatever. It was his choice, so I had to do it.

    So basically, I've been procrastinating and researching for four years now. I mean, how in the heck do you make a WWI rook? Or even a bishop or queen, for that matter? About a month ago, I gave up and made the decision that it was becoming a checkers set and "you git what you git, and you don't throw a fit." Not a particularly jolly Christmas spirit, but at least it's finished.

    Here it is, in all it's glory. I'm pretty proud of it. To solve the "kinging" dilemna, I made little gold Medals of Honor that the wee soldiers get to wear when they are kinged. I also made one of the American G.I.s look like my boss (well, he has glasses, at least.) I hope he likes it.... actually, I hope he hasn't moved to Scotland without telling me. In that case, Anna is getting a cartoon WWI checkers set for Christmas.


    Monday, December 11, 2006

    3D Paper Snowflake


    3D Paper Snowflake

    WikiHow has an awesome tutorial on making 3D snowflakes out of paper. They're super easy and so pretty! Kasey and I tried our hand at making one last night and it turned out so neat, if I do say so. Ours is huge compared to the one in the pictures from the Wiki site but we used regular 8.5" x 11" copy paper. Because of that paper, it's also kind of flimsy but this was just a test and we're going to make more using a stiffer paper. We're also going to make smaller ones and ones from colored paper.

    Instructions from wikihow are here. Let me know how yours turns out.

    Easy, Inexpensive Holiday Gifts

    Brownie Mix in a Jar

    Who doesn't love brownies? Nobody, that's who. That's why a brownie mix in a jar makes a great gift: it looks cool, it's easy and inexpensive to make, and it turns into brownies! I like to keep a couple of these on hand for "emergency" situations, like when someone gives you an unexpected gift and you want to look like you already planned something in return.

    Basically, you layer all the dry ingredients in a jar, then add a tag explaining what wet ingredients (like eggs and oil) to add and how to finish the recipe. There are countless variations; this one comes from Allrecipes.com and includes pecans, which have no business in a brownie but can be replaced with chocolate chips or even coconut. In addition to the ingredients themselves, you'll need quart jars and tags for the baking instructions. Buy everything in bulk and you'll have enough lovingly homemade gifts for everyone on your list.

    cocoa%20sleeve.jpg

    One final note: this doesn't have to be a regular old brownie mix. Search Allrecipes.com for "in a jar" and you'll find loads of brownie varieties as well as cookie recipes. Yet another variation: Family Fun's Hot Chocolate Cones, which rely on cone-shaped bags instead of jars. Whatever mouth-watering mix you choose, don't forget your favorite editors during this special season.

    The Winter Emergency Car-Kit

    Think of a friend or loved one stranded in the ditch while the snow continues to pile up. Not a pretty picture, is it? A homemade emergency kit not only helps ensure their safety, it also says you care.

    Start with a large coffee can. Decorate it as you see fit, starting with blank or holiday paper wrapped around the outside. Now, fill it with the following:

    • Rock salt, filling roughly half the can. If the car gets stuck in the snow, the salt will help give the tires some traction and, hopefully, get it unstuck.
    • A few roadside flares.
    • A couple granola bars (stranded people get hungry).
    • A pair of stretchy knit gloves (which are very small until you pull them over your hands). Maybe a knit cap, too.
    • A small flashlight and a pack of fresh batteries.
    • A mini first-aid kit with bandages and aspirin.
    • A small bottle of water. Yes, it may get frozen, but it's still worth having.
    • A pocket-size book of Sudoku puzzles to pass the time waiting for the tow truck.
    • A small, laminated sheet of emergency numbers, like AAA, towing services, etc.
    • If you're really ambitious, add a compatible Energizer Energi To Go powerpack for the recipient's cell phone. Because the battery will invariably die the moment the car gets stuck.

    Everything but the rock salt should go inside an oversized Ziplock bag to keep it from getting mixed in with the salt. All told, the kit shouldn't cost more than $10-15, unless you add the Energi To Go (which costs around $20).

    Holiday Peppermint Bark

    Spray a large cookie tray with non-stick spray and then line it with a piece of way paper. Take several large candy canes or a bag of peppermint candies and crush them into small pieces. (How much peppermint flavor you like should determine how many you chop up.)

    On the stove, melt two bags of white chocolate chips at a low temperature. When melted, add most of the crushed peppermint and stir it in. Pour the mixture onto the cookie tray and spread over the tray until flat and even. Sprinkle the remaining peppermint pieces on top, pressing them in with a spatula.

    Let it cool. Peel off wax paper and break into pieces. Enjoy!

    Cocoa in a jar

    Layer the ingredients for homemade cocoa in a jar, add a ribbon and a tag, and you have a simple but stylish gift. Our mixes will fill 1-quart jars (12 servings; see below for sources), but if your containers are different sizes, just keep the ratio of ingredients constant. On the back of the tag, write: "Mix contents in a large bowl. For each serving, place 1/3 cup cocoa mix in a mug and stir in 1 cup boiling water. Store remaining mix in airtight container."

    Classic Cocoa

    Mexican Cocoa
    CLASSIC COCOA

    Layer 1 cup granulated sugar, 1 cup unsweetened cocoa powder, 1 cup powdered milk, 1/2 teaspoon salt, 1/2 cup miniature chocolate chips, and 1/2 cup miniature marshmallows. Makes 1 quart mix or 12 servings hot cocoa.

    Per serving: 142 cal., 20% (29 cal.) from fat; 3.7 g protein; 3.2 g fat (1.9 g sat.); 30 g carbo (2.6 g fiber); 1 mg chol.


    MEXICAN COCOA

    Layer 1 cup unsweetened cocoa powder, 1 cup powdered milk, 1 cup firmly packed brown sugar, 1/2 teaspoon salt, 1 tablespoon ground cinnamon, and 3/4 cup chopped Mexican chocolate (such as Ibarra). Add a few cinnamon sticks to top of jar. Makes 1 quart mix or 12 servings hot cocoa.

    Per serving: 158 cal., 14% (22 cal.) from fat; 3.4 g protein; 2.4 g fat (0.8 g sat.); 33 g carbo (2.1 g fiber); 1 mg chol.


    Peppermint Stick Cocoa
    Mocha Cocoa

    PEPPERMINT STICK COCOA

    Layer 1 cup powdered milk, 1 cup unsweetened cocoa powder, 1 cup granulated sugar, 1/2 teaspoon salt, 1/2 cup miniature chocolate chips, and 1/2 cup crushed peppermint candy. Makes 1 quart mix or 12 servings hot cocoa.

    Per serving: 172 cal., 17% (29 cal.) from fat; 3.7 g protein; 3.2 g fat (1.9 g sat.); 37 g carbo (2.6 g fiber); 1 mg chol.


    MOCHA COCOA

    Layer 1 cup unsweetened cocoa powder, 1 cup granulated sugar, 1/2 cup espresso powder, 1 cup powdered milk, 1/2 teaspoon salt, and 1/2 cup chopped bittersweet chocolate or miniature chocolate chips. Makes 1 quart mix or 12 servings hot cocoa.

    Per serving: 141 cal., 23% (32 cal.) from fat; 4.1 g protein; 3.5 g fat (1.9 g sat.); 28 g carbo (2.3 g fiber); 1 mg chol.

    Photos by David Prince

    Sources: Vintage straight-sided Ball canning jar. Rounded 1-liter French canning jar from the Container Store (www.containerstore.com or 888/266-8246). Vintage metal-clip jar. Glass 1-quart cracker jar with aluminum screw-top lid from the Container Store.


    Copyright 2004 Sunset Publishing Corporation


    Sunday, December 10, 2006

    No Knead Bread

    Another yummy gem from FoodMomiac! Supposedly this recipe is so simple that a 5 year old could make most of it.

    No-Knead Bread

    Adapted from Jim Lahey, Sullivan Street Bakery

    Time: About 1½ hours plus 14 to 20 hours’ rising

    3 cups all-purpose or bread flour, more for dusting
    ¼ teaspoon instant yeast
    1¼ teaspoons salt
    Cornmeal or wheat bran as needed.

    1. In a large bowl combine flour, yeast and salt. Add 1 5/8 cups water, and stir until blended; dough will be shaggy and sticky. Cover bowl with plastic wrap. Let dough rest at least 12 hours, preferably about 18, at warm room temperature, about 70 degrees.

    2. Dough is ready when its surface is dotted with bubbles. Lightly flour a work surface and place dough on it; sprinkle it with a little more flour and fold it over on itself once or twice. Cover loosely with plastic wrap and let rest about 15 minutes.

    3. Using just enough flour to keep dough from sticking to work surface or to your fingers, gently and quickly shape dough into a ball. Generously coat a cotton towel (not terry cloth) with flour, wheat bran or cornmeal; put dough seam side down on towel and dust with more flour, bran or cornmeal. Cover with another cotton towel and let rise for about 2 hours. When it is ready, dough will be more than double in size and will not readily spring back when poked with a finger.

    4. At least a half-hour before dough is ready, heat oven to 450 degrees. Put a 6- to 8-quart heavy covered pot (cast iron, enamel, Pyrex or ceramic) in oven as it heats. When dough is ready, carefully remove pot from oven. Slide your hand under towel and turn dough over into pot, seam side up; it may look like a mess, but that is O.K. Shake pan once or twice if dough is unevenly distributed; it will straighten out as it bakes. Cover with lid and bake 30 minutes, then remove lid and bake another 15 to 30 minutes, until loaf is beautifully browned. Cool on a rack.

    Yield: One 1½-pound loaf.


    UPDATE: I assume FoodMomiac obtained this recipe from an article in the NYTimes. I didn't realize at the time that this recipe was wide-spread across the internet and everybody's been raving about it. Anyway, here's an update to this recipe by the original author, Mark Bittman.

    No Kneading, but Some Fine-Tuning

    By MARK BITTMAN

    Published: December 6, 2006

    LAST month I wrote about Jim Lahey, the owner of Sullivan Street Bakery on West 47th Street in Manhattan, and his clever way to produce a European-style boule at home. Mr. Lahey’s recipe calls for very little yeast, a wet dough, long rising times and baking in a closed, preheated pot. My results with Mr. Lahey’s method have been beyond satisfying.

    The Bread Baker

    Happily, so have those of most readers. In the last few weeks Jim Lahey’s recipe has been translated into German, baked in Togo, discussed on more than 200 blogs and written about in other newspapers. It has changed the lives (their words, not mine) of veteran and novice bakers. It has also generated enough questions to warrant further discussion here. The topics are more or less in the order of the quantity of inquiries.

    WEIGHT VS. VOLUME The original recipe contained volume measures, but for those who prefer to use weight, here are the measurements: 430 grams of flour, 345 grams of water, 1 gram of yeast and 8 grams of salt. With experience, many people will stop measuring altogether and add just enough water to make the dough almost too wet to handle.

    SALT Many people, me included, felt Mr. Lahey’s bread was not salty enough. Yes, you can use more salt and it won’t significantly affect the rising time. I’ve settled at just under a tablespoon.

    YEAST Instant yeast, called for in the recipe, is also called rapid-rise yeast. But you can use whatever yeast you like. Active dry yeast can be used without proofing (soaking it to make sure it’s active).

    TIMING About 18 hours is the preferred initial rising time. Some readers have cut this to as little as eight hours and reported little difference. I have not had much luck with shorter times, but I have gone nearly 24 hours without a problem. Room temperature will affect the rising time, and so will the temperature of the water you add (I start with tepid). Like many other people, I’m eager to see what effect warmer weather will have. But to those who have moved the rising dough around the room trying to find the 70-degree sweet spot: please stop. Any normal room temperature is fine. Just wait until you see bubbles and well-developed gluten — the long strands that cling to the sides of the bowl when you tilt it — before proceeding.

    THE SECOND RISE Mr. Lahey originally suggested one to two hours, but two to three is more like it, in my experience. (Ambient temperatures in the summer will probably knock this time down some.) Some readers almost entirely skipped this rise, shaping the dough after the first rise and letting it rest while the pot and oven preheat; this is worth trying, of course.

    OTHER FLOURS Up to 30 percent whole-grain flour works consistently and well, and 50 percent whole-wheat is also excellent. At least one reader used 100 percent whole-wheat and reported “great crust but somewhat inferior crumb,” which sounds promising. I’ve kept rye, which is delicious but notoriously impossible to get to rise, to about 20 percent. There is room to experiment.

    FLAVORINGS The best time to add caraway seeds, chopped olives, onions, cheese, walnuts, raisins or whatever other traditional bread flavorings you like is after you’ve mixed the dough. But it’s not the only time; you can fold in ingredients before the second rising.

    OTHER SHAPES Baguettes in fish steamers, rolls in muffin tins or classic loaves in loaf pans: if you can imagine it, and stay roughly within the pattern, it will work.

    COVERING BETWEEN RISES A Silpat mat under the dough is a clever idea (not mine). Plastic wrap can be used as a top layer in place of a second towel.

    THE POT The size matters, but not much. I have settled on a smaller pot than Mr. Lahey has, about three or four quarts. This produces a higher loaf, which many people prefer — again, me included. I’m using cast iron. Readers have reported success with just about every available material. Note that the lid handles on Le Creuset pots can only withstand temperatures up to 400 degrees. So avoid using them, or remove the handle first.

    BAKING You can increase the initial temperature to 500 degrees for more rapid browning, but be careful; I scorched a loaf containing whole-wheat flour by doing this. Yes, you can reduce the length of time the pot is covered to 20 minutes from 30, and then increase the time the loaf bakes uncovered. Most people have had a good experience baking for an additional 30 minutes once the pot is uncovered.

    As these answers demonstrate, almost everything about Mr. Lahey’s bread is flexible, within limits. As we experiment, we will have failures. (Like the time I stopped adding flour because the phone rang, and didn’t realize it until 18 hours later. Even this, however, was reparable). This method is going to have people experimenting, and largely succeeding, until something better comes along. It may be quite a while.

    Saturday, December 9, 2006

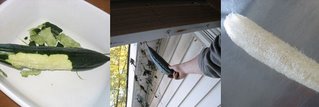
    Grow your own Loofa!


    GroovyGreen has a nice little tutorial about growing your own loofa sponges! Check it out!

    Thursday, December 7, 2006

    Personalized Calling Cards

    Fabulous Stationary Calling Cards
    They want $55 for a set of personalized note/business cards!

    Now, why couldn't a person just make them themselves and print them off? There's all kinds of neat fonts, graphics and logo makers out there. I think I'll try to make myself a set. They're too cute.

    Tuesday, December 5, 2006

    Sangrias! YUM!


    I've never had a Sangria. It's #72 on my 101/1,001 list of drinks that I want to try. FoodMomiac combines Sangrias and Bunco (#40 on the list too) for a fun girls night out. I've always wanted to try Bunco too but we can't seem to get enough people together to have an official Bunco party. But that doesn't mean I can't still try the Sangrias! *teehee*

    Sangrias by FoodMomiac

    Favorite Sangria
    (from a 1983 issue of Gourmet, found via epicurious.com)

    2 bottles chilled, dry red wine
    1 cup cognac
    1/2 cup Triple Sec or Cointreau
    1/3 cup superfine sugar (often found at the liquor store)
    1 orange, sliced thinly
    1 lemon, sliced thinly
    2 cups chilled seltzer

    In a bowl, (you need a giant bowl - I often use a giant pitcher instead) combine the booze and the sugar. Stir until the sugar is dissolved. Add citrus slices and chill for an hour. Transfer to a punch bowl (if you roll like that - I usually just keep it in the pitcher - after two drinks everyone will be too drunk to care how fancy you are), stir in the seltzer and add a block of ice or some ice cubes.

    Monday, December 4, 2006

    Rules of the Taco by FoodMomiac

    I LOVE, not like, LOVE homemade tacos!
    FoodMomiac has some tasty tips and a great recipe for homemade taco seasoning that I just have to try. I already have all the ingredients to make it. I'll let you know how it turns out. Tacos anyone?

    Rules of the Taco by FoodMomiac

    "........tacos are an awesome meal for a busy family. Kids generally love them, and they take virtually no time to prepare. However, please follow my three taco rules before preparing them. You'll thank me, I promise.

    - Use good shells. Of the major supermarket brands, I like Ortega. However, if you can find an alternate brand that is made without partially hydrogenated oil, that would be preferable.
    - Have great toppings on hand. Avocado, sour cream (tonight we used plain yogurt), black olives, shredded cheese, etc.
    - Finally, never, ever, ever use taco seasoning in a packet. Make your own - it's easy, I swear."

    Taco Seasoning

    2 tablespoons chili powder
    1 teaspoon cumin
    1 teaspoon garlic powder
    1/2 - 1 teaspoon salt (depending on how much you want it to taste like the commercial stuff)
    1 tablespoon flour
    2 tablespoons dehydrated minced onion
    freshly ground pepper to taste

    To prepare tacos, brown one pound of ground beef over medium heat. Add seasoning mix and cook until fragrant (about two minutes). Add about three tablespoons of water. Cook for an additional minute or two.

    Moulding Gourds & Vegetables

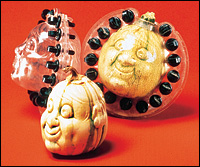
    Yes, that's really a gourd. Incredible, huh?

    Dan Ladd has been moulding gourds for over 25 years.
    The Process of molding these gourds is as follows. The small gourd fruit after dropping its flower is inserted through the mould opening. The gourd grows into the mold confines during the summer season. At frost time the stem is cut leaving the mould with the gourd inside. The mould is then opened and the gourd is set to dry. When dry the gourd may be treated in certain ways, the skin may be scraped away, partially scraped away or left intact. The gourd may be mineral oiled or waxed with bowling alley wax. The artifact has as definite a viability as any hard, cellulose, wood like material, and will endure as such with reasonable care.


    This is more my speed.
    Vegiforms

    Concrete Leaf and Sand Castings

    I sooo dig stuff like this!


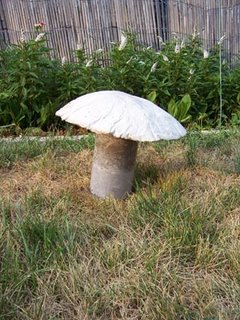
    Concrete Mushrooms


    Concrete Birdbath
    Made from a rhubarb leaf


    Another variation of the rhubarb birdbath
    Many other kinds of leaves used at this site. Beautiful!


    Excellent Concrete Casting tutorial from GardenWeb.com